The Tags Settings tab allows fleet managers to create and manage tags that help categorize and organize vehicles, drivers, and devices within the system. Tags may be simple standalone labels or part of a nested hierarchy, enabling structured categorization such as region → city or vehicle type → subtype. Tags also play a central role in controlling user data visibility, ensuring managers and users only see the vehicles, drivers, trips, and other data associated with their assigned tags.

Tags Overview
The table displays all the tags created for the fleet, allowing you to efficiently organize and access tag details. It supports downloading, sorting, filtering, resizing columns, and other customization options. For a complete guide, refer to the article How to Use Table Options.
| Tag Value |
The name of the tag. If the tag is nested under another tag, the full hierarchy path is shown, separated by "/" (for example, "West Coast / California"). |
Add or Edit a Tags
The system uses a unified form for both tag creation and tag editing. You can open it via:
-
Add Tag Button: Used for creating a new tag in the system.

-
Edit Tag Option: Allows you to update the details of an existing driver
The form interface is designed for simplicity and includes the following fields:
| Tag Value |
Enter the name of the tag as it will appear in filters, assignments, and user visibility rules. (Required) |
| Parent Tag (optional) |
Optionally assign a parent tag to establish a nested hierarchy. Defaults to "None (root level)." Leaving it as None creates a top-level tag. Selecting a parent tag nests the new tag beneath it. Nested tag structures improve clarity when filtering, assigning tags to drivers or assets, and organizing large fleets (e.g., Vehicles → Heavy Duty → Refrigerated). These relationships don't change how tags function but provide cleaner grouping and more intuitive navigation. |
Quick Action Menu
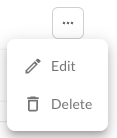
1. Edit a Tag
Opens an interface where you can configure the tags's settings initially set during their creation. For more information, refer to the article How to Add or Edit a Tag.
2. Delete a Tag
Permanently removes the selected tag from your fleet, once deleted, all associated data will no longer be accessible in the system.
Warning
Deleting a tag is a permanent action and cannot be undone.
Adding Tags in Bulk
The bulk upload feature allows you to add multiple tags to the Fleet Portal at once using a CSV template. This eliminates the need to create tags one by one and saves time when setting up tag structures for large fleets.
How to Upload Tags in Bulk
- Navigate to the Tags page in the Fleet Portal.
- Click the Add Multiple Tags button.
- Fill in the template with your tag details.
- Upload the completed file and click Submit.
Template Fields
| Field |
Description |
| tagValue |
The name of the tag |
| parentTagValue |
The name of the parent tag, if this tag is part of a hierarchy. Leave empty if the tag has no parent. |
Note
Always use the provided template when uploading tags in bulk. Uploading
a file with missing or incorrectly formatted columns may cause the upload
to fail.